
The Best Worm Composter
Home › Garden › Composting ›
The Best Worm Composter & Worm Bin Buying Guide
Vermiculture is a fantastic way of re-purposing food scraps into an amazing compost.
Anyone can start up a worm farm by recycling leftover food scraps that turn into nutrient-rich vermicompost that plants will love!
We’ve researched the best worm composters to find the most efficient, easiest to use and best designed bins on the market.
When you buy products through the links on this site we may earn an affiliate commission. Learn more

The Overall Best Worm Compost Bin
Hungry Bin Continuous Flow-Through Vermicomposter
The most expensive but the sturdiest & best worm composter overall
This innovative continuous flow-through worm composter from New Zealand company Hungry Bin takes all the hassle out of collecting and harvesting your worm castings.
Pros
- Made in New Zealand
- Large composting area
- Removable worm tea & casting trays
- Lifetime guarantee on parts
Cons
- No worm tea spigot
- Can overheat in warm climates
Hungry Bin Worm Farm Review
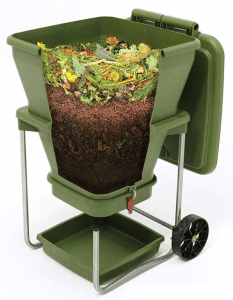
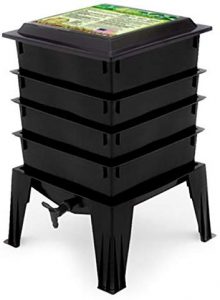
The award for best overall worm composter goes to the Hungry Bin Continuous Flow-Through Vermicomposter. It’s the most expensive on the list but you really get what you pay for with this one.
The tapered bin section is made of up to 15% recycled food-grade polypropylene plastic and has a total footprint of 25.6” x 23.6” at its widest point a height of 34.4” making it one of the bulkiest worm bins out there.
The shape of the Hungry Bin Vermicompster creates a large area at the top of the bin…your composting worms have easy access to any new food scraps you place inside.
Fortunately, the Hungry Bin comes with a zinc plated frame adding strength and rigidity as well as large, heavy duty wheels so even at its fully loaded weight of 209lbs you will be able to move it around your garden easily if you need to.
New Zealand based Hungry Bin are so confident in the ruggedness of their design they even offer a lifetime guarantee on parts!
Unlike its cheaper competitors the Hungry Bin uses a patented continuous flow-through design so there’s no messing around with stacking trays.
The shape of the Continuous Flow-Through Vermicompster creates a large area at the top of the bin so your composting worms have easy access to any new food scraps you place inside.
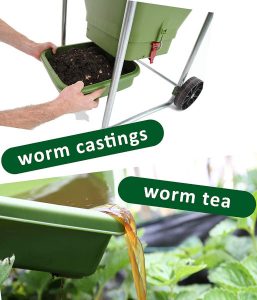
As the food waste is processed it is compressed downwards through the taper into the bottom of the bin where it compacts into a very potent worm casting fertilizer.
To access it just unclip the bottom section and collect your castings. As with most worm bins your worm tea will drip down into a special collection tray at the bottom.
Unusually it doesn’t feature a spigot or siphon for collecting the liquid. Instead the liquid is funnelled through a filter and into a drip tray at the base of the bin that lifts away for easy pouring onto your plants.
The wheelie-bin style lid of the Hungry Bin does a good job of keeping flies, pests and rainwater out and smells inside whilst allowing easy access to add new food scraps.
If this is your first adventure into vermicomposting then you will appreciate the detailed instructions provided by Hungry Bin as well as a comprehensive timeline for you to follow with diagrams and tips to get your bin set up and producing castings as fast as possible.
Cons
The fact that the Hungry Bin Vermicomposter does not feature a spigot for worm tea collection will be a negative for some and a positive for others. Whilst they are a useful feature when they work, they are prone to getting blocked with stray lumps of compost making them unusable.
Hungry Bin’s use of the open liquid reservoir at the bottom is certainly a fool proof design but make sure you don’t leave the liquid sitting too long as it will attract all sorts of creepy crawlies!
The other main issue is temperature control. Certain types of food waste such as grains will significantly raise the internal temperature of the bin.
Due to its tapered flow-through design this heat can become trapped inside and if it gets too hot your worm will try to escape! For this reason, it may not be the best worm bin for hotter climates unless you are keeping the bin in a garage or outbuilding.
![]()
The Best Worm Compost Bin on a Budget
VermiHut 5-Tray Worm Compost Bin
The best value worm composter
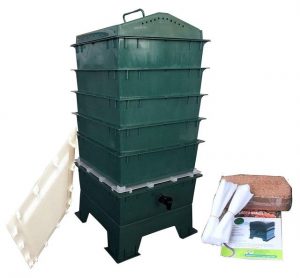
Despite its small 16.5” x 16.5” footprint this 5-tray worm bin from VermiHut will chew through 2.5kg of food waste/day giving you one of the most efficient worm bins at an unbeatable price.
Pros
- Worm tea spigot
- Worm collection grill
- Small footprint
Cons
- Expansion trays difficult to buy
- Air holes attract fruit flies
Vermihut 5-Tray Composter Review
The VermiHut 5-Tray Worm Composter Bin is perfect for getting into vermiculture on a budget and contains most of the features you see in other more expensive tray-based worm composters.
Set up is easy! Fill one of the trays with the correct bedding material and add composting worms and food waste to get the ball rolling then let the worms get to work!
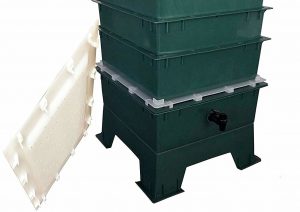
Its design allows you to stack 5 levels of food waste in its 11.25” x 11.25” x 5” trays giving you a total food waste consumption of 5lbs of scraps per day, plenty for your average household. The overall footprint is just 16.5” x 16.5” including the legs so it’s small enough to fit in a garage, outbuilding, patio or even indoors.
Set up is easy too. Start out by filling one of the trays with the correct compost bedding material, your composting worms and some food waste to get the ball rolling and let the worms get to work. When your first tray is starting to get full then just start filling one of the remaining trays.
Your precious worm tea will slowly work its way down to the bottom of the VermiHut composter where it will be collected in the liquid tray. The liquid tray features a small spigot or tap, a common feature in most worm bins, that will allow you to harvest the liquid whenever you need it.
To stop your worms falling into the liquid tray VermiHut have included a new feature in their newer versions of the 5-Tray Worm Compost Bin. A special plastic grill fits between the final compost tray and the liquid reservoir that catches any stray worms before they drop into the worm tea so you can easily scoop them up and put them back to work making worm castings!
VermiHut claim their stackable design is odourless but, like most worm bins, an incorrectly set up composter will always have a bit of a smell to it. Make sure you are feeding your compost worms the correct food and maintaining the correct moisture and temperature levels if you want to use it in an enclosed space.
The designers of the 5-Tray Worm Compost Bin have created a unique dome-shaped lid that helps maintain the correct moisture levels meaning it will run mostly on autopilot and create a more liveable environment for your worms.
Cons
Whilst the VermiHut is unbeatable at the under $100 price range, there are a few downsides to mention.
VermiHut don’t make it easy to buy extra trays to stack on top of the 5-Tray model. Other manufacturers using this same stackable design, such as the popular Worm Factory models, allow you to purchase extra trays to expand the height of your worm bin up to 8 trays.
Expansion trays for the VermiHut can sometimes be found at Walmart or directly from the manufacturer in China but they are not always easy to get your hands on.
If you plan on expanding your worm bin in the near future or if you are not sure if the VermiHut 5-Tray can handle your food waste output then it would be worth paying more upfront for one of the larger or more easily expandable worm bins.
In some climates the VermiHut 5-Tray can also become a magnet for fruit flies. Some users have tried taking matters into their own hands by fitting mesh over the air holes in the top of the bin so beware if you were planning to keep the bin near your house or in a garage.
The Best Indoor Worm Compost Bin
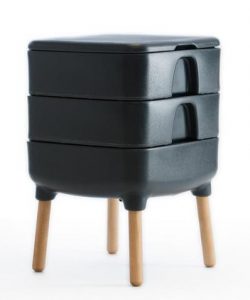
Hot Frog Living Composter
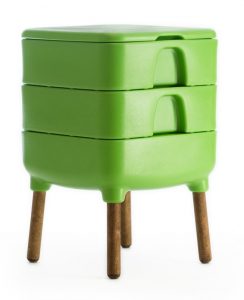
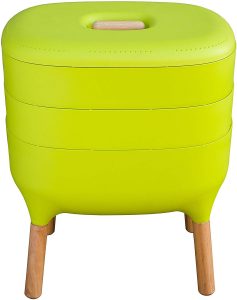
A beautifully designed worm bin perfect for indoor use
This stylish worm bin from FCMP, constructed from Maple and BPA-free plastic, looks good enough to take pride of place in any kitchen.
Pros
- Attractive design
- Extra trays available
- Odor-free composting
- Available in a range of colors
Cons
- Too small for large-scale worm composting
Hot Frog Living Composter Review
If you live in an apartment, don’t have a big garden or you want to be able to tip your food scraps in your composter without venturing outside then the Hot Frog Living Composter from Canadian company FCMP Outdoor is the best worm composter for indoor use.
Top on the list of pros is the fact that a lot of thought has been put into making the Hot Frog look good enough to live inside your home.
Each tray features a complex system of tunnels and spaces that allow air to move through, maintains a steady temperature, and creates routes for your worms to hunt food scraps.
FCMP have used an attractive Maple hardwood for the legs and recycled BPA-free polyethylene for the bin itself. The plastic is UV resistant and the hardwood legs are treated with a urethane coating so the Hot Frog composter is certainly tough enough to be left outdoors as well if you wanted.
It’s also one of the only worm bins that come in a range of colors including grey, black, green and plum.
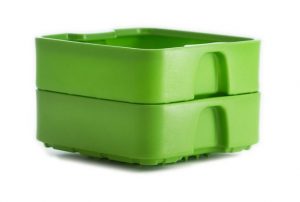
With a total footprint of just 15” x 15” and a height of 22” this is one the smallest composters on the market so it’s perfect for a kitchen or utility room. Despite this it manages to pack 3 gallons of usable volume in each 13” x 13” x 4” tray (6 gallons total) which should be enough for smaller households.
FCMP also sell an expansion set that increases the number of compost trays from 2 to 4, doubling your capacity. Under the compost trays a liquid reservoir collects your worm tea and a like most worm bins on the market, a spigot allows you to easily harvest the liquid.
Each compost tray features a complex system of tunnels, support struts and spaces that allow air to move through the composter whilst also maintaining a steady temperature and plenty of routes for your worms to move through the bin to find food scraps.
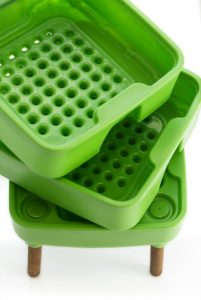
When it’s time to collect your worm castings you will notice that they will have passed through the specially angled tunnels and can be easily collected in the base of the unit above the liquid reservoir. The Hot Frog Living Composter’s well thought out design ensures your food scraps are broken down fast which stops any bad odors from escaping so it’s perfectly suited to being used in enclosed spaces.
FCMP have made the set up really easy by including coconut coir and shredded paper as bedding material with their product which are both excellent for building a good environment for you composting worms.
If you are looking for something even smaller than the Hot Frog Living Composter then have a look at the review for the miniscule Biovessel Eco Living Composter further down the page.
Cons
There really aren’t many downsides to the Hot Frog Living Composter to mention. If you have a large household and produce a lot of food waste you may find yourself having to purchase the expansion kit straight out of the gate but the bin and the expansion trays available through the FCMP website are reasonably priced considering how well designed this composter is.
Best of the Rest
Worm Factory 360
A popular worm composter let down by design flaws
Although it’s one of the most popular kits, the Worm Factory 360 suffers from poor quality control and design flaws that can turn your worm composter into a haven for fruit flies. The lack of rims on the stackable trays cause them to sink into the lower levels, reducing the overall usable composting volume to only a few inches per tray.
Pros
- Made in the USA
- Available in 3 colors
- Expandable from 4-8 trays
- Worm tea spigot
- Bedding material and accessory kit included
- 10-year warranty
Cons
- Gaps & air holes attract fruit flies
- Too much space for worms to escape
- Trays don’t stack well & sink into lower trays
- Issues with QC & missing accessories
Biovessel Eco Living Composter

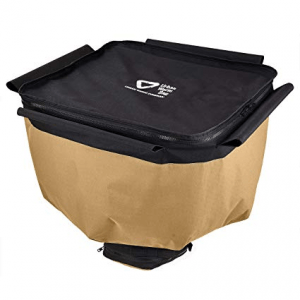
Urban Worm Bag Version 2
Urbalive Indoor Worm Farm
What to Look For
Worm composters come in all shapes and sizes so it helps to know which features you will need when narrowing down your choices.
Look for products with UV resistance to stop plastics becoming brittle and if wood is used make sure it is appropriately weather coated.
Design
The three main worm bin designs are:
- Stacking tray systems
- Continuous flow-through bins
- Hanging Bags
Which of those suits your requirements will depend on where you will keep the composter, your local temperature and climate, rainfall and how you want to harvest the worm castings.
What’s the best worm bin design?
1. Continuous flow-through
Continuous flow-through worm bins work by taking advantage of worm’s natural feeding tendencies to help reduce the amount of maintenance needed in between harvests.
Worms tend to feed nearer to the surface and excrete their castings deeper in the earth. Continuous flow-through designs take advantage of this by allowing you to dump your scraps in the top and harvest your castings from an opening near the bottom.
This keeps your worms working at maximum efficiency as they don’t have to go looking all over the bin for food. Instead, they can work closer to their natural behaviours of feeding near the surface where the fresh organic matter lies. As more food is added and more castings are harvested, you will get a “continuous flow” of castings from top to bottom as the worms feed and create more castings.
2. Tray systems
Tray systems are one of the laziest ways to collect worm castings while still being efficient, making them great for beginners.
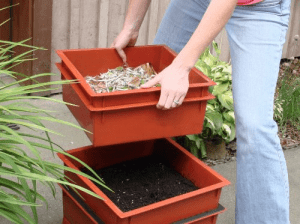
Setting up your tray system is simple. Load up a tray with your choice bedding, toss in your daily organic scraps and repeat until the tray begins to approach the top. Once your tray reaches the top rim, load up another tray with bedding and place it on top of the previous tray.
Once the worms finish chowing down on the bottom tray, they’ll naturally move their way up to the next tray, leaving you behind a tray full of valuable vermicast.
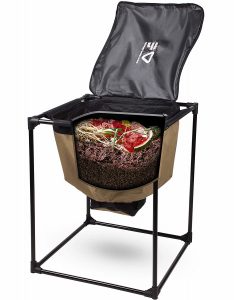
3. Hanging worm bins
Hanging worm bins work similarly to continuous flow-through systems, just by using a bag instead of the standard continuous flow bin design.
Organic scraps go in the top, and worm castings can be collected from the bottom opening of the bag.
Hanging worm bins are surprisingly convenient for indoor worm farmers since they can be hung on a stand with space for a collection bin underneath. Some models can even hang on the back of a door in case you’re short on space or prefer the extra convenience of running of a smaller worm farm.
4. Outdoor worm bins
Outdoor worm bins can come in several varieties.
Typically, they are segmented into above-ground and below-ground worm bins.
Above-ground worm bins are large bins or flow through designs that are temperature controlled through insulation and depend on the natural heat of the worm composting process to keep the worms warm.
Below-ground worm bins are buried bins that are less prone to temperature swings and maintain similar conditions to what worms are familiar with.
Others dig windrows, known as vermitrenches, which are long trenches dug into the ground. These trenches work just like regular worm farms that contain bedding with scraps continuously added to the top. Windrows have become less popular with more efficient worm bin designs becoming popularised over the years, however some stick to the old-fashioned way of digging vermitrenches and raising worms.
Footprint
You will also want to be mindful of the total size of the footprint of the worm bin. Sizes can vary from 15” x 15” up to almost 30” x 30” so again keep in mind this will affect your decision depending on whether you plan to tuck the composter in the corner of your kitchen or outside in your yard.
Materials
If you are storing the worm bin outside you have to know that it will stand up to the elements. Look for products with UV resistance to stop plastics becoming brittle and if wood is used in the product make sure it is appropriately weather coated.
Indoor vs outdoor
Some composters are designed primarily for outdoor use such as the rugged looking Hungry Bin Continuous Flow-Through Vermicomposter while others are more pleasing to the eye like the Hot Frog Living Composter which was clearly designed with indoor use in mind.
Worm tea collection
Worm tea is the most potent fertilizer that you will harvest from your worm composter. Some products use a spigot or tap to allow easy collection of the liquid while others use a drip tray. Both have their pros and cons which are outlined in the reviews.
Expandable
If this is your first time getting into vermiculture then it’s difficult to estimate how much food waste you will be able to add and how much compost you will get in return. Some worm bins allow expansions sets to be added so if you find yourself running out of space you can always add more.
How does Vermicomposting Work?
Vermicomposting starts with certain species of worms such as red wigglers, white worms, and other earthworm species. When these worms are fed organic material such as food scraps, they chow down on your leftovers and turn it into vermicast.
Vermicast is both higher in nutrients and lower in contaminants than the original material, making it a potent compost that makes plants grow like crazy!
All you need to get started is the right worm, some organic food scraps, and a worm bin with bedding.
Worm composting is great for the environment too. Vermicomposting recycles organic matter, preventing it from going to the landfill. Worm composting also helps your local environment by improving the soil, retaining moisture and reducing your plants’ water usage.
How do worms make compost?
Worms make compost by tunnelling through their bin and looking for food. Once they find food, they chow down, and digestion begins.
Worms digest food using “grit” which are sandy particles that break down food through friction. Worms get this grit from the soil, although you can also supplement their grit supply with washed and ground eggshells.
After the food is broken up by the worm’s grit, it moves into their intestine where the worm absorbs some nutrients before expelling worm castings which are discharged into the soil.
These castings are commonly called “black gold” due to their high concentration of good soil bacteria and nutrients. Gardeners also give them the name black gold due to their unique porous shape that increases air and water circulation in the soil, making them perfect for helping plants grow healthier and faster.
From the time you add organic matter to the worm bin to the time it’s ready for harvest can take about three months if you feed your worms daily. A less optimal worm farm will be producing compost up to every six months, meaning your worm to food ratio needs adjusting!
Worm Composting vs Regular Composting
For those interested in making their own compost, the idea of whether they should choose worm composting or traditional composting often comes to mind.
So, which is better, worm composting or regular composting?
It depends on how active you want to be in the composting process and how rich you want your compost to be.
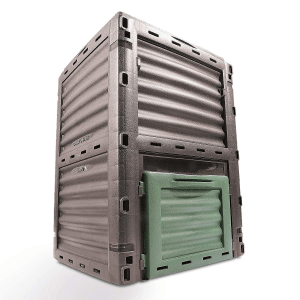
Traditional composting
For regular composting, all you need to get started is a compost bin that to hold your scraps.
Traditional compost tends to smell, so you’ll want your setup outdoors and away from the house. Keep in mind this also means you’ll need to walk further to put your compost into your bin. If it’s freezing cold or blazing hot outside, you’ll want to keep that in mind when placing your compost bin far away from your house.
If you live a neighbourhood, be sure also to put your compost pile somewhere the neighbours won’t complain about the rotting stench. If you don’t have lots of land, you may wish to avoid traditional composting.
Compost bins get hot, which is why you’ll often hear the process referred to as “hot composting.” This heat kills most pathogens and sterilises any seeds or weeds in the compost pile.
Unlike worm compost bins, there are no creatures to aerate the compost for you. You’ll need to stir the compost pile now and then to speed up the composting process and prevent the smell from getting too intense.
Without worms to break down the compost and seed it with nutrients, the end product won’t be nearly as nutrient-rich as the “black gold” worm castings.
For comparison in just how potent worm castings are compared to regular compost, a cubic yard of regular compost goes for about $6 to $30 while a cubic yard of “black gold” worm compost goes for anywhere from $300 to more than $2200!
What are the advantages of vermicomposting?
Vermicomposting, on the other hand, isn’t quite as easy to set up, but once you’ve got everything started it doesn’t take much to keep the black gold flowing!
Opposite of regular composting, worm composting bins don’t produce any odour. No odours mean they can be placed indoors or outdoors, including in small apartments, as opposed to compost bins which should only be placed far away from your house.
While traditional composting requires you to aerate the soil, with vermicomposting your worms will aerate the soil for you, so there’s no need to stir your worm compost bins. Also, the stirring that occurs when you harvest your compost is adequate for aerating and decompressing your bin’s soil.
What are the disadvantages of vermicomposting?
There are a few drawbacks to vermicomposting, but they can be easily managed.
The main disadvantage of vermicomposting is that you can’t dump unlimited scraps into your worm bins. While you can keep throwing scraps onto the pile with traditional composting, doing so with vermicomposting can cause your vermicomposting bins to smell and become too acidic, which can hurt the worm’s skin. This happens because your worms can only eat so much food and the food left lying around in the bin begins to rot.
Vermicomposting also requires an upfront time investment compared to traditional composting. Vermicomposting requires you to procure worm bins, bedding, worms and oversee the operation to produce compost. Comparatively, regular composting can be started just by throwing food scraps in a garbage can sitting in your backyard.
However, the potent “black gold” compost that you get from vermicomposting is worth several times more than standard compost and makes plants grow like crazy.
How to Start a Worm Farm at Home
If you want to know how to make vermicompost at home, there are a few things you’ll need to learn first.You can’t just start a vermicomposting operation with only one worm! Try the worm density calculator to see how many worms we recommend starting with.One of the most common questions asked by people wanting to know how to make worm compost is “does worm composting smell”? Under ideal conditions no, worm composting doesn’t smell. If your worm compost smells, you’re either overfeeding the worms or feeding them something they shouldn’t be eating. Now that we’ve answered one of the most asked questions let’s look at everything you need to know about setting up a worm bin.
What are the best worms for composting?
There are many types of worms used in vermicomposting, however starting out you should only be concerned with the question: “what are the best worms for composting”?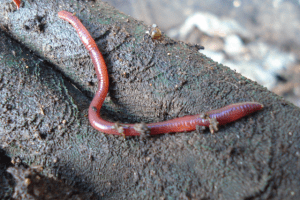 The vermicomposting community tends to agree that red wigglers are the best worm for composting with redworms coming in a close second.
Red wigglers thrive in a compost environment and prefer it to regular soil. Placing red wigglers in their preferred compost environment makes them produce much richer castings than other worms who prefer to feed on regular soil.
The vermicomposting community tends to agree that red wigglers are the best worm for composting with redworms coming in a close second.
Red wigglers thrive in a compost environment and prefer it to regular soil. Placing red wigglers in their preferred compost environment makes them produce much richer castings than other worms who prefer to feed on regular soil.
How many Red Wigglers do I need?
You can’t just go starting a vermicomposting operation with only one worm! When you’re planning out your worm farm, you need to have a rough estimate for how many scraps you produce daily. Red wigglers eat about one-half of their body weight every day. Plan that for every pound of organic matter you produce daily, you’ll need about two pounds of red wigglers in your worm bin. Try the composting worm density calculator to see how many worms we recommend starting with.Where can I buy worms for a worm farm?
When it comes time to buy your worms, you have two options. You can either try to track down a local supplier for your worms, or you can buy composting worms online. Whichever route you go down, you’ll probably order your red wigglers by the pound, which typically contains about 1000 worms! Just remember that for every pound of scraps you plan to add daily, you’ll need to order about two pounds of worms.What’s the best food for a worm farm?
If you’re wondering what to feed to worms, generally worms aren’t too picky. However, there are clear lists of foods worms love and foods you should avoid feeding your worms. Here’s a list of the best scraps for a worm farm:- Fruits
- Vegetables
- Grains including bread and pasta
- Shredded paper (except bleached white paper)
- Coffee grinds
- Tea bags
- Hair
- Cow/horse manure (NOT manure from household pets such as dogs/cats)
- Aged and dried lawn clippings (fresh clippings can overheat the worms and kill them)
- Salty foods
- Citrus
- Spicy foods
- Oils
- Food with preservative (processed foods)
- Meat and fish
- Dairy
- Foods that are thermally hot/cold (bring to room temperature before adding to the bin)
What’s the best temperature for a worm farm?
The ideal temperature for a worm farm will be between 60 to 80 degrees Fahrenheit (15 to 27 degree Celsius. Ideally, you should measure your worm farm with a thermometer for accurate readings. If you lack a thermometer, given that 60 to 80 degrees are also the ideal temperature for an indoor space, you can merely touch the bedding to see if it’s too hot or too cold. If you touch the bedding and your hand feels cold, your worms will be cold. If you touch the bedding and your hand feels hot, your worms will be hot.What’s the best location for a worm farm?
The best location for a worm farm needs to meet a few essential criteria. First, it should be within the ideal temperature range of 60 to 80 degrees Fahrenheit (15 to 27 degrees Celsius). It should ideally be out of direct sunlight, as this can quickly heat the bin to dangerous levels even if the surrounding temperature is within the acceptable range. The location can be either indoors or outdoors since a properly maintained worm farm won’t give off any odour. Second, your worm farm shouldn’t be in an area where it can become saturated with moisture. Keep it sheltered from the rain so that your worms won’t drown if a storm comes through. Third, it must be in a well-ventilated area but sheltered from strong winds. Ventilation is essential to maintaining the correct oxygen levels in the soil for your worms to breathe. However, strong winds can dehydrate the soil and suck away moisture. One easy way to get extra ventilation for your worm bin is to raise it off the ground through a stand or just by putting it up on cinder blocks/bricks so that air can flow through the bottom. Considering all the criteria above, here are a few of the best locations for your worm farm:- Basement
- Kitchen
- Bathroom
- Garage/shed (if not prone to extreme temperatures)
- Deck/patio (if local climate fits ideal temperatures)
What’s the best bedding for a worm farm?
Bedding is the material placed in your worm bin that helps retains moisture and gives your worms a comfy home. Some people confuse bedding with soil, which is not what you want for vermicomposting. Red wigglers prefer a compost environment as opposed to a soil environment, meaning the best soil for composting is some form of bedding material. Proper bedding will have a neutral pH, have no sharp or abrasive materials, have excellent moisture retention and allow oxygen flow.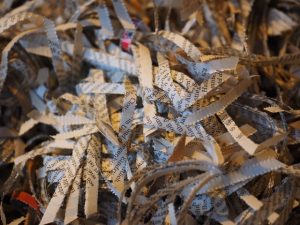 Here are some materials that fit the bill as the best bedding for a worm farm:
- Shredded cardboard
- Shredded paper (expect bleached white paper)
- Shredded newspaper (except coloured ink)
- Aged compost
- Horse/cow manure
- Coconut coir
- Peat moss
- Straw/hay
- Dried leaves and other yard waste
- Wood chips
Worm composting indoors
You’ll notice that a few of the best locations for a worm farm were indoors. Worm composting indoors is becoming more and more common as people in urban areas begin their vermicomposting operations. Even people in rural areas with plenty of land sometimes house their operations indoors.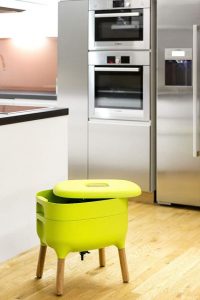 Keeping your worm composting bins indoors is an easy way to maintain ideal temperature, shelter them from the elements, keep away pests and conveniently add your daily scraps.
If you’re concerned about odour, it shouldn’t be an issue given you’re not overfeeding your worms or feeding them anything you shouldn’t be eating.
Keeping your worm composting bins indoors is an easy way to maintain ideal temperature, shelter them from the elements, keep away pests and conveniently add your daily scraps.
If you’re concerned about odour, it shouldn’t be an issue given you’re not overfeeding your worms or feeding them anything you shouldn’t be eating.
How to apply vermicompost to plants
You’re probably excited to apply some of that vermicompost “black gold” to your plants! That’s what vermicompost is for after all. Before applying, it’s best to know how to apply vermicompost and how much vermicompost to use. There are two main ways to apply vermicompost. The first way to apply vermicompost is to mix it in with your plant soil. Ideally, you should aim to mix vermicompost with the soil at a 1:5 ratio, meaning 1-part worm compost per 5-parts of soil. This is a general benchmark that most people say to start with. However, you can test different ratios yourself to see what works best for your plants. The second way to apply vermicompost is to apply a layer of it to the drip line around your plant. A “drip line” is the circumference around the plant from the longest outward branches. This is the area where water would “drip off” your plant and land on the ground beneath.
When you apply compost here, tiny roots in this area soak up retained moisture and extra nutrients supplied by the compost. Test this one out for yourself, and you’ll see your plants grow like crazy!
The second way to apply vermicompost is to apply a layer of it to the drip line around your plant. A “drip line” is the circumference around the plant from the longest outward branches. This is the area where water would “drip off” your plant and land on the ground beneath.
When you apply compost here, tiny roots in this area soak up retained moisture and extra nutrients supplied by the compost. Test this one out for yourself, and you’ll see your plants grow like crazy!